자바스크립트에서 사용자가 입력한 데이터의 유효성을 검증하는 라이브러리인 Joi 에 대해 사용방법에 대해 알아보겠습니다.
자세한 사용법은 아래의 Joi 사이트를 참고
joi.dev
address formula joi-date pinpoint
joi.dev
1. Joi 특성
단순하게 보면 입력한 데이터의 검증은 if 문을 사용하여 값이 유효한지 판단할 수 있지만 입력한 데이터가 많을 경우 모든 값을 if 문으로 검증하기 어렵습니다.
Joi 는 스키마 기반으로 사전에 각 필드별 유효한 데이터의 기준을 정해주고, 필요한 곳에 함수 형태로 불러서 사용할 수 있어 데이터 유효성 검증에 편하게 사용할 수 있는 라이브러리 입니다.
2. Joi 설치 및 셋팅
https://www.npmjs.com/package/joi
joi
Object schema validation. Latest version: 17.10.1, last published: 2 days ago. Start using joi in your project by running `npm i joi`. There are 10348 other projects in the npm registry using joi.
www.npmjs.com
터미널에서 joi 설치하기
$ npm install joi
joi 사용하기 위해 require 로 joi 를 불러옵니다.
아래 예시는 스키마 형태로 각 데이터의 유효성 검증수준을 지정합니다.
username의 경우 문자열, 문자숫자만 가능, 최소 3자에서 30자 가능하고, 필수 입력사항으로 선언하였습니다.
const Joi = require('joi');

const schema = Joi.object({
    username: Joi.string()
        .alphanum()
        .min(3)
        .max(30)
        .required(),

    password: Joi.string()
        .pattern(new RegExp('^[a-zA-Z0-9]{3,30}$')),

    repeat_password: Joi.ref('password'),

    access_token: [
        Joi.string(),
        Joi.number()
    ],

    birth_year: Joi.number()
        .integer()
        .min(1900)
        .max(2013),

    email: Joi.string()
        .email({ minDomainSegments: 2, tlds: { allow: ['com', 'net'] } })
})
    .with('username', 'birth_year')
    .xor('password', 'access_token')
    .with('password', 'repeat_password');


schema.validate({ username: 'abc', birth_year: 1994 });
// -> { value: { username: 'abc', birth_year: 1994 } }

schema.validate({});
// -> { value: {}, error: '"username" is required' }

// Also -

try {
    const value = await schema.validateAsync({ username: 'abc', birth_year: 1994 });
}
catch (err) { }3. 사용예시
app.js 의 각 라우트 핸들러내에 스키마 형태 유효성 검증을 할 수 있지만 코드의 재사용성을 높이기 위해 별도 함수로 만들어 필요한 곳에 불러와서 사용하도록 하겠습니다.
(...)
const validateCampground = (req, res, next) => {
const campgroundSchema = Joi.object({
campground: Joi.object({
title: Joi.string().required(),
price: Joi.number().required().min(0),
image: Joi.string().required(),
location: Joi.string().required(),
description: Joi.string().required(),
}).required(),
});
const { error } = campgroundSchema.validate(req.body);
if (error) {
const msg = error.details.map((el) => el.message).join(",");
throw new ExpressError(msg, 400);
} else {
next();
}
};
(...)
app.post(
"/campgrounds",
validateCampground,
catchAsync(async (req, res) => {
if (!req.body.campground)
throw new ExpressError("Invalid Campground Data", 400);
const campground = new Campground(req.body.campground);
await campground.save();
res.redirect(`/campgrounds/${campground._id}`);
})
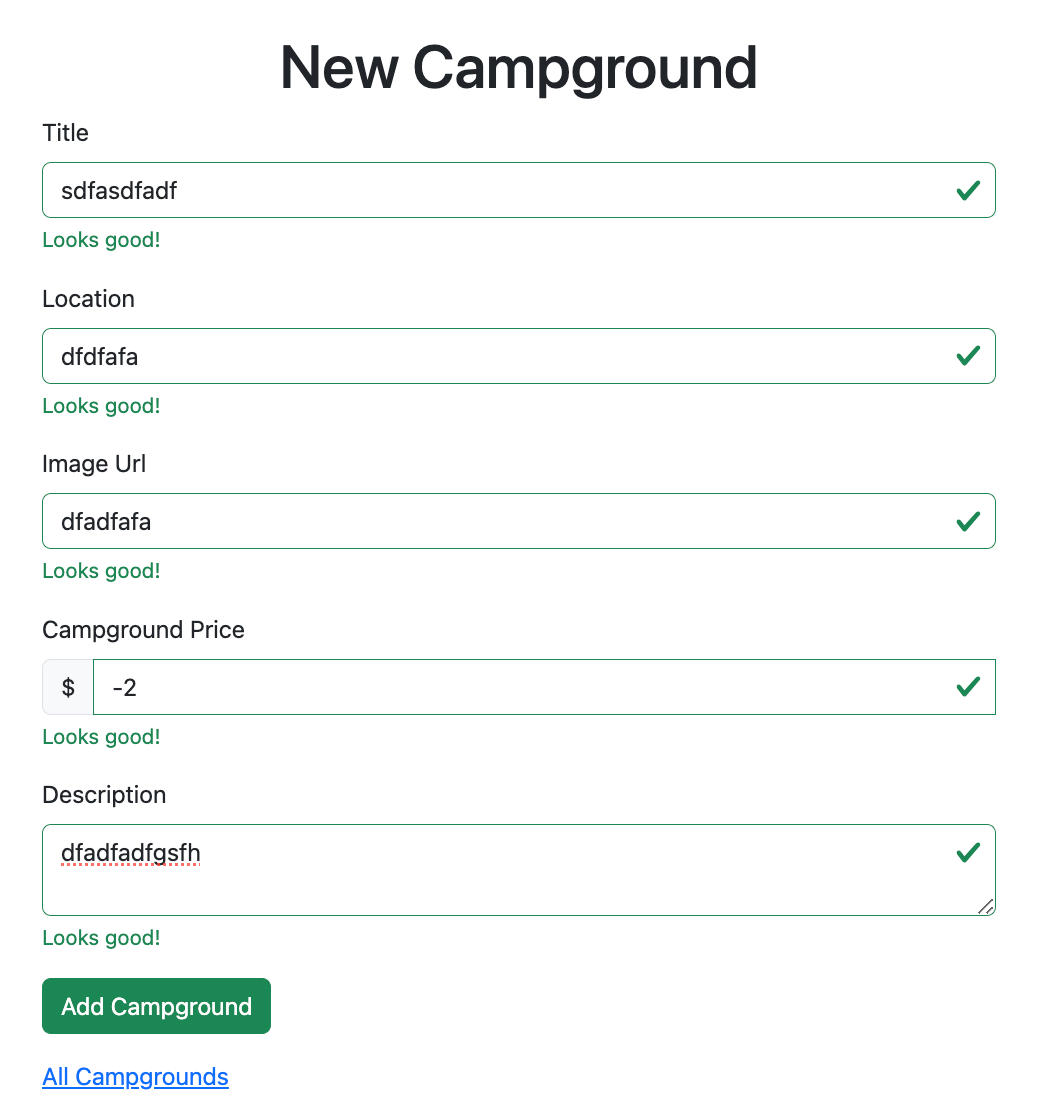
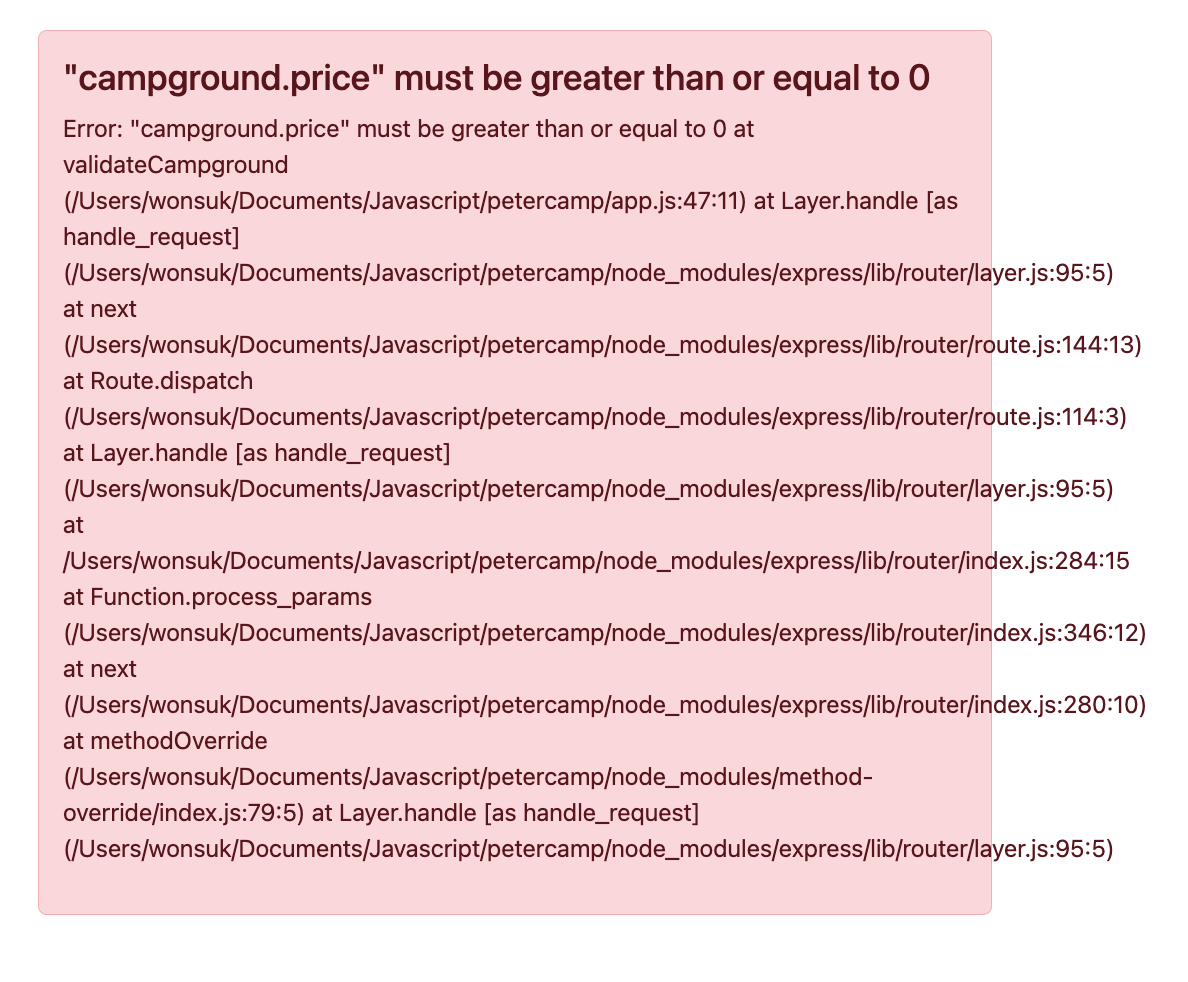
);postman에서 신규 캠핑장을 만들 때 데이터 입력 유효성 검증사항을 확인해 봅니다.
required 는 필수 입력 값 설정이며 필드 특성에 맞게 min, max 등 추가 요건을 설정할 수 있습니다.
설정 가능한 범위는 Joi 공식사이트에서 확인 가능합니다.
price 최소값으로 0 이상 설정하였는데 -2 를 입력하니 0 이상 값을 입력하라는 에러 화면이 표출됩니다.

유효성 검증 스키마를 다른 파일에서도 활용 가능하도록 schema.js 파일로 분리합니다.
이 스키마는 mongoose model 에 정의한 스키마와는 다르다는 것만 주의 바랍니다.
const Joi = require("joi");

module.exports.campgroundSchema = Joi.object({
  campground: Joi.object({
    title: Joi.string().required(),
    price: Joi.number().required().min(0),
    image: Joi.string().required(),
    location: Joi.string().required(),
    description: Joi.string().required(),
  }).required(),
});
이에 맞춰 app.js 도 변경합니다. joi는 app.js에서 더 이상 사용하지 않으니 사용등록은 삭제하고 스키마 파일에서 campgroundSchema 모듈을 불러와서 사용 가능하도록 합니다.
const express = require("express");
const path = require("path");
const mongoose = require("mongoose");
const ejsMate = require("ejs-mate");
const { campgroundSchema } = require("./schema.js");
const catchAsync = require("./utils/catchAsync");
const ExpressError = require("./utils/ExpressError");
const methodOverride = require("method-override");
const Campground = require("./models/campground");
(...)
const validateCampground = (req, res, next) => {
  const { error } = campgroundSchema.validate(req.body);
  if (error) {
    const msg = error.details.map((el) => el.message).join(",");
    throw new ExpressError(msg, 400);
  } else {
    next();
  }
};
'자바스크립트(Javascript)' 카테고리의 다른 글
| Express 보안 - Helmet 사용하기 (0) | 2023.10.02 |
|---|---|
| 이미지 파일 저장하기 - multer (0) | 2023.09.23 |
| 평점 표현 하기 - Starability 라이브러리 (0) | 2023.09.18 |
| bootstrap validation 폼(form) 태그에 적용하기 (0) | 2023.08.29 |
| [Node.js] ejs-mate 사용하여 템플릿(template) 화면 만들기 (0) | 2023.08.27 |


